Tips For Taking Great Product Photos
Jul 11, 2024
Follow these tips to take great product photos quickly and easily without the need for any special equipment.
Product photos are an essential marketing asset of any e-commerce business, including subscription box businesses. Those images are used for more than just listing products on your website. They SELL your products - and your subscription box. You’ll use those images on your website, social media, blogs, Pinterest, etc.
Product photos are HIGHLY important to your business. Take the time and effort to make them the best they can be so you can put those images to work for you.
Spend a little time upfront with your pictures to save a TON of time later when you want to use them over and over again.
Keep reading for my top tips for taking great product photos.

1. Uplevel Your Product Photos with Photo Backgrounds
Make your product the star by using a background that displays it to its best advantage - without distracting from it. Photo backgrounds come in MANY different forms.
I use a few different backgrounds to keep my photos looking fresh and fun.
- Vinyl backdrop - These come in many different sizes and are relatively inexpensive. Choose the right size or sizes for your products. If you have smaller products get a small one, if you have larger products, get something larger. Find similar ones HERE on Amazon.

- Wood Floor - Do you have a gorgeous wood floor? Take advantage of its beauty and use it as your backdrop. Just make sure it's clean each time you’re ready to take pictures.
- Poster Board, Scrapbook Paper - You can even use a file folder like this cute one I had laying around. Make sure the pattern isn't too busy - you want your product to be the star of the photo.

I’ve taken things from the floor to a table for my product photos. I have a light-colored 4x4 table that does the job perfectly.

When choosing a background, the most important thing is that it is light so it doesn't compete with the color of your product. I love a light wood or white background. Be aware that background colors can change the appearance of your products. I have a turquoise table I sometimes use that can make my items look green!
2. Use the Right Lighting for Great Product Photos
You don’t need an expensive lighting system to take great product photos.
When we first moved into the warehouse, we used the bright ceiling UV lights. More recently, we upgraded to a table set up with a few ring lights and softbox lighting. We also have a lot of big windows in the front that are perfect for taking great photos.

When I was just starting out, I took photos in the entryway of my house. I would lay my background down and open the front door to let all that natural light in.
Natural light can be beautiful as long as you take care not to be in direct sunlight. It's harsh and doesn't photograph well.
Now that you’ve chosen the perfect background and your lighting is on point, it’s time to "set the stage!"
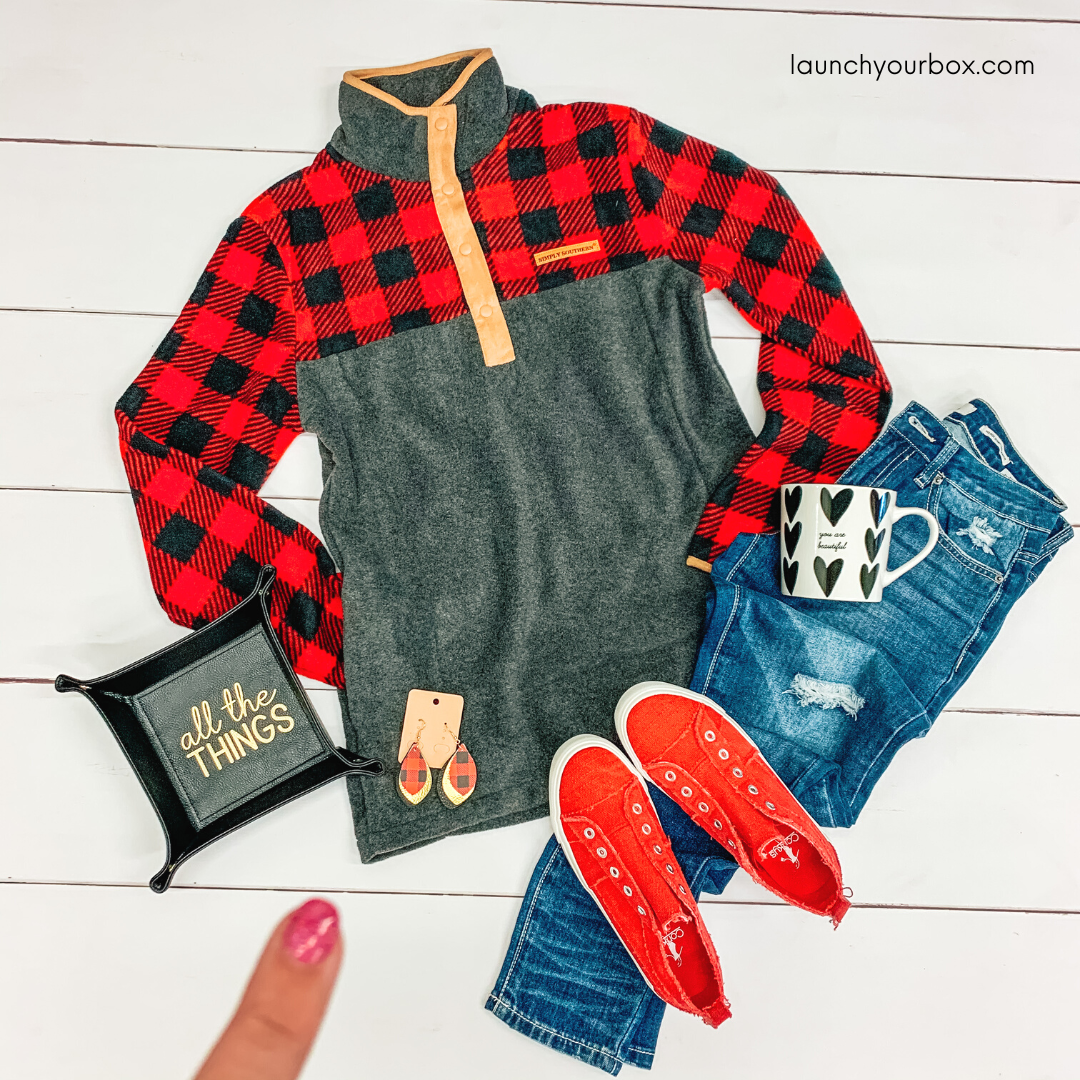
3. Coordinate Products for Cohesive Product Photos
You can photograph your products by themselves, just like the earrings above. Or you can create a "look" by adding coordinating items with home decor, jewelry, clothing, etc. These images help customers see how they can put your products to use.
Here, I’m photographing pullovers. Instead of taking a picture of just the pullover, I created an entire outfit. Now my customers are able to easily imagine how they can fit my pullovers into their wardrobes.

I create coordinating looks for photos with:
- Other products I carry in the store like bags and earrings. This generates extra sales and increases average order value!
- Items I've purchased on clearance at other stores. When I am out shopping, I like to check the clearance section for a cheap way to stockpile items I can use all the time. I have several pairs of ripped jeans specifically to use in photos.

- Items from home. I grabbed this cute mug from my kitchen cabinet. Don't be afraid to use some of your personal items.
- Items from Amazon. As an Amazon Influencer, I can create affiliate links from Amazon. I buy several things a month from Amazon to use in my photos because I want to make sure the quality is up to my standards before suggesting them to my customers. I earn a small percentage of sales every time one of my customers buys from my Amazon shop!
Find all my favorite subscription box supplies in my Amazon Shop!

4. Protect Your Product Photos with a Watermark Logo
When I compose my photos, I place my products strategically to allow room for my watermark. I watermark all my product photos. In the past, I've had my photos stolen and used on someone else's page. Placing a watermark logo on the picture helps to prevent that.
I use an app called iWatermark from Apple.
Want to learn my quick and easy - and very low-tech - method? Simply place your finger right where you’ll put the watermark, leaving space in your flat lay to make sure you don't cover anything up!
5. Use Your Phone’s Camera for Easy, High-Quality Product Photos
Telling you about the watermark app on my phone was a hint about the type of camera I use for my product photos. I don’t use any fancy equipment - I use my phone to take all my product photos. You can, too. Today’s cell phones have some of the highest quality cameras built right into them.
There’s no need for you to invest in a fancy camera. Using one requires a lot of time and effort to take photos and then edit them. Instead, just whip out your phone, snap a few pics, edit them right there, and move on!
6. Edit Your Product Photos for Best Results
Let's talk about editing. Even with great lighting and a well-thought-out composition, you may still need to edit your pictures. I use the Lightroom app on my phone to take a good picture and make it great! See how it brightens up the product and background?

Just be careful when using the presets in Lightroom. Make sure it doesn't alter the color of your items.
*Sarah’s tip: Update your pictures in Lightroom first, then watermark them.
7. Use Lifestyle Images for Creative Product Photos
I've shown you several ways to set up and take pictures using backgrounds, but I also want you to take photos called 'Lifestyle Images.' These are pictures where your product is being used or is in its environment.
This mug is full of coffee and in its natural habit so to speak. I've taken this image in the spot where this mug will be used. It looks more “real life” and homey in a kitchen than if I took a picture of it against a neutral background.


The main picture of my subscription box is more of a staged picture showing all the items in the box. This time I staged that shot poolside, where I envision my subscribers using the items.

The photo with the cans inside the cooler is more of a lifestyle picture. Take it further and put someone else in the photo drinking a can from that cooler.

Think about where and how your products will be used. There are so many ways you can create lifestyle images. Use your imagination and have fun with it!
One last bonus tip for taking great product photos...
When taking product photos, spend a little extra time and take multiple pictures of the same thing in different ways.
Check out these pictures I did for my T-Shirt Club tee. I created four different looks at the same time. Now I have a new picture to post each week, several different pins, conversation starters to ask my audience which look is their favorite, and I can even write a blog about how to style the same tee in four different ways.

Learn from me:
- Subscription Box Blueprint eBook: This $17 ebook covers logistics from product selection to packaging to shipping. Plus a 90-day launch plan and bonus ‘Instant Scripts’ for your social media.
- Launch Your Box: My complete training program that walks you step by step through how to start, launch, and grow your subscription box business.
- Launch Your Box Podcast: I share tons of practical tips and strategies to help you start, launch, and grow your subscription box business. You’ll also hear from industry experts and current Launch Your Box members who are crushing it - get ready to get inspired!
- One Box at a Time: Inside my book One Box at a Time, I show you the steps you need to follow to start and launch your subscription box. To turn your dream into reality. This book is filled with proven teachings, valuable resources, best practices, and action steps for you to take.
Find me on social:
-
Facebook: @SubBoxwithSarah
-
Instagram: @howtostartasubbox
- YouTube: @sarahwilliams5836
Are you ready for Launch Your Box? Our complete training program walks you step by step through how to start, launch, and grow your subscription box business. Join our waitlist and we will notify you when the group reopens.
Hear from Sarah each week!
Do you want weekly tips for starting, launching, and growing a subscription box? Subscribe to get our latest content by email.
By submitting you are agreeing to receive Sarah's awesome newsletters to learn more about how to start a subscription box! Cancel anytime.